Spring Allergies! Spring Tonics! (Why Cleansing your Liver will often get rid of allergies.)

10 04 2018

When people think of tonics they often think of drinking an alcoholic images-10beverage with a few herbs for taste, but I am here to tell you different.

When talking about tonics especially “spring tonics”, what Herbalists are referring to is taking herbs that help “tone” the function of the liver.  Spring time is the time when the “liver” will want to get rid of toxins that have built up over the colder months of winter, or your wet season.  Since in the cooler months, no matter where you live, it is more difficult to get rid of toxins in your body because we are not “sweating” enough to get rid of them.  By the way, the way the liver releases toxins is through the bowel.

If the word “toxins” creates skeptism, then I would suggest visiting these websites to see how many pollutants, chemical & heavy metal by nature, are affecting our food and water.  In fact, you can read up on how many toxins are found in the “cord blood” of a new born baby.  It’s quite alarming!

The Environmental Working Group 

Greenpeace Canada

The Natural Resources Defense Council

Basically, the herbal “spring tonics” help the liver to do its functions of creating vitamins, hormones, making bile for fat emulsification, and detoxifying the body of its chemicals & heavy metals that get into the body through air, eating & drinking plus also through the skin.

Some of the gentle tonics in the herbal world are; Dandelion root & leaf, Cleavers, Milk Thistle, Yellowdock, Burdock, Nettle leaf, Raspberry Leaf, Red Clover Tops, just to name a few.  The easiest one to start with is Dandelion since it grows well in spring, though due to spraying I would not recommend collecting it within city limits or in ditches.  It’s best to buy it organic through markets etc.  The ideal way to take a spring tonic for the liver is in tea form, though for some, including me, the bitterness of some of the liver spring tonics is too much for tea.  You have to experiment a bit to see what you can handle.  Whatever the case, these tonics I’ve listed are very gentle and are not for deep detoxification, but would be useful for younger people and kids.

When considering allergies, think of a glass that is being filled up with “muddy” water with the “muddy” water representing toxins, it will overflow at some point giving you symptoms to deal with.  In the case of the liver, spring allergies is the overflow symptom that you often will get.

When dealing with severe allergies in spring, which is one of the main ways the liver will show it needs cleaning, people will often need a mixture of herbs that work both on bile production & lymphatic congestion.  The herbs that work on bile production will help the bowels move to eliminate waste build up in the colon which in turn helps take a load off the liver.  The lymphatic herbs help get the garbage from your lymphatic system and your liver into your bowel.  (Your bowels need to be moving 3x per day, after each meal if you are eating 3 meals per day or 1 or 2 if eating 1 or 2 meals per day.  They should be a “twoonie” size around and be as long as your arm…just FYI.)  The liver will keep your blood purified so that you can stay alive, but when your colon is full it will have a lot more work to do to keep the toxins from killing you so it will purify, purify, and purify!  So getting rid of that “solid waste” build up will take a load off the liver which will in turn give you more energy.

This more intensified herbal formula is usually taken in capsules since the teas would be to bitter to consume, though some can endure it.  These formulas must be applied by a professional who can make sure that it isn’t too strong for you to take and can also make sure that you combine a good “cleansing” diet with the herbs to get optimum performance.

Dark leafy greens, but not Kale since it has been shown to be high in a heavy metal called Thallium, the “spring mix” is good or the baby romaine lettuce or the baby spinach is good along with organic fresh lemon juice in water, organic lime juice, etc., light proteins like beans, lentils, some small fishes (check list for fish high in heavy metals), organic chicken, organic apples, organic carrots, organic beets are some of the foods you can eat on a cleanse.

Remember a cleansing diet is not enough as foods alone (unless you can eat things like Mustard Greens) will not have the power in their plant chemistry to promote the deeper detoxification phases of the liver.  You have to have the deeper cleansing herbs for that.

I am going to “refrain” from listing the deeper cleansing herbs only because I don’t want people to rush out and buy them, mix them up themselves without knowing how or what ratios to use etc., you really need to consult with someone who is “in the know”.  Sorry to those who are disappointed about this, but I will say that Christopher Hobbs who has written a book many years ago on Liver Herbs, has very good information for those who want a reliable reference book to help themselves with.

1. Natural Therapy for Your Liver by Christopher Hobbs.

2. Foundations of Health by Christopher Hobbs. (Limited Availability)

In conclusion, when you clean out your liver via herbs, diet, skin brushing, colon cleansing etc., you ultimately lower the toxins in your blood which in turn makes you less susceptible to allergies in the spring.  But if you find you still have allergies after consulting a professional, as well as using ideas from the above publications, then you may need some homeopathic remedies, which I will have to write about in another blog post, since it goes beyond the scope of this article.


Disclaimer:
This article is written for educational purposes only and whoever reads this is solely responsibility for applying or not applying the suggestions.  This article does not take the place of consulting with professionals in the Holistic Health field as well as those in the Western Medical field.  Trying things on your own should be coupled with advice from the appropriate person.


30 07 2014


1. Take 15 minutes every morning to relax before rushing out the door.  (Sit cross-legged on a hard floor andimgres-10 sip hot water if experiencing sever constipation.)  Deep breathing exercises are also helpful to do at this time.  Ie. Breathe from belly not chest.                                       

See the information here:   http://modernherbalmedicine.com/articles/breathe-your-way-to-better-physical-and-emotional-health.html

2. Avoid anything containing white flour, rice & white sugar, as much as possible.  (called the “white plague.”)

3. Remove as many of the external stresses from your life such as: being ‘too busy’ plus deal with internal stressors like; lies you tell yourself, ‘stuffing’ your feelings, feeling bad about yourself and any “co-dependent” or “co-addictive”, or addictive behaviour.

4. Drink at least 1 to 2 litres of water per day between meals.  (non-chlorinated)

5. Eat lots of fibre in your diet.  If you can eat grains, eat whole grains.  Regardless, everyone should take a fibre drink once per day.  See the information here:                                                                              http://www.hiraihealth.com/pdf/How%20to%20take%20a%20fiber%20drink.%202012.pdf 

6. Eat lots of “live food” like sprouts, fresh vegetables, juices, raw salads, fruit and avoid deep fried and heavy foods containing wheat, dairy, beef or pork.  (These are all hard on the liver.)

7. If your colon lacks tone, do the colon exercises listed on the ‘Colon Regime’ article here:  http://www.hiraihealth.com/pdf/Colon%20Therapy%20Regime%202012.pdf

8. Get checked for a nutrient deficiency if you are still constipated.  If you are low in any of the B vitamins, lecithin or acidophilus, – these help the colon stay lubricated and toned up.

9. Eat and drink fermented foods, and I don’t mean alcoholic fermented beverages.  I mean Water Kefir, Milk Kefir, Kombucha, Fermented Vegetables etc.  These help to maintain a healthy digestive tract.

10. When traveling, take your enema bag along.  (Refer to ‘How to Give Yourself a High Enema.’ http://www.ozonelab.com/monica/enema.htm )    You can also benefit from doing a colonic before and after you travel.  Book these appointments ahead of time.  Also, herbal laxatives such as Senna, Cascara sagrada are okay for occasional constipation.  Do not take herbal laxatives as a long-term solution.   Please consult with me during your next appointment so I can help you determine the cause of your constipation and a plan to address this properly.

11. If you are on drugs or medication, check to see if constipation is a side effect.  Ie. Pain killers cause constipation.  There are herbal alternatives to help with pain.

12.Iron supplements can also cause constipation.  Herbal iron supplements are superior as they do not cause constipation and absorb better to.  

13.Have an assessment to determine if your stomach or liver may be causing the constipation you are having.


Tips to Increase Your Energy

17 07 2014

 1. Remove all white flour, white sugar and white rice from your diet.  Replace 

images-15with whole grain flour, whole grain sugar cane and brown rice….according to your ABO blood type.

2. Eat the “beneficials” off your blood type chart.

3. Food combine.  Proteins and veges.  Starches and veges.  For more information read about it in the “Body Ecology Diet” book.

4. Drink hot water with fresh lemon squeezed into it.  It helps to unclog the liver.

5. Do a liver/gallbladder flush after doing a series of colonics.

6. Do a liver cleanse with herbs and a series of colonics to flush out the toxicity from your body.

 7. Use fiber drinks and bowel tonic herbs to increase your elimination.

 8. Eat raw veges at lunch and at dinner.

 (compatible with your blood type.)

 9. Juice vegetable juices and drink 2 to 4 – 8 oz glasses daily.

 10. Drink wheatgrass juice in lemon water or in unfiltered, organic apple juice.

 11. Go on a cleansing diet of raw vegetable juices and raw vegetable salads with lots of green veges and sprouts…do for 4 to 10 days if you can.  Come off of it with light proteins.

 12. Drink non-chlorinated water.

 13. Have a bath with 35% hydrogen peroxide in it….soak at least 30 minutes.


Kombucha Recipe

6 05 2014

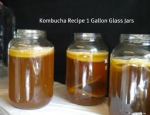
Kombucha is a fermented drink made from a Mushroom that grows in black tea/organic whole cane sugar & water.  When it is strong enough it will taste like beer without the alcohol.  The taste of this can easily be images-1disguised by adding an unsweetened juice to your cup along with the Kombucha Brew that you make.  It is very good for your gut and will also boost your immune power.  Try some today!  Let me know what changes you experience when you drink this brew on a daily basis!  Here is the basic recipe!


 Kombucha

  • 1 cup organic sugar cane sugar.
  • 4 bags black tea or 4 teaspoons loose black tea 
  • mushroom(I do not rinse it, I keep on reusing it until it gets rather thick, then I separate the older layers and throw it away or could give to someone else to use as a starter)
  • 1 cup starter kombucha liquid
  • 4 liters purified/filtered water
  • use a large jar…Ie. Gallon size so mushroom has room to spread out.

Steps

  1. boil water
  2. add tea bags or loose tea to brew
  3. add sugar
  4. cool down, strain tea leaves or take out tea bags.
  5. fill glass jar, leave about 1 inch of so room at the top .  Need 1 gallon jar.
  6. add mushroom and starter liquid
  7. cover with cheese cloth or coffee filter and secure the cover with an elastic.
  8. I set it in the cupboard to ferment/or cover it with a box.
  9. leave minimally for 5 to 7 days, I usually need 3 weeks, our kitchen can get quite cold.
  10. some people flavor their kombucha, just add different flavour of unsweetened juice to it.


Fruity Lemon Water Kefir

18 12 2013

images-14

1/  1 package of Water Kefir Grains that have already been activated.  (If you do not know how to do this, then please refer to the instructions contained in the box that held the package of Water Kefir Grains.)

2/  125 mL of Cane Sugar  (Organic Cane Sugar is the best.)

3/  1 to 2 dried figs (Can also be raisins, sultanas, dried prunes etc. Organic is best.)

4/  Half a lemon.

5/ 1 to 1.5 Litres of Filtered Water, it can be water that contains minerals. Ie.  Does not have to be distilled or reverse osmosis water.

6/  2 Litre glass container or two different glass jars that will hold 1 litre each.

7/   Coffee filter or cheesecloth & 1 elastic.

8/  Plastic sieve or strainer.

9/  Plastic or wooden spoon.  (Do not use metal spoons or bowls or metal anything when you make any kind of culture.)

Steps:

1/  Dissolve sugar in the water.

In the container, pour in mineral water and add the sugar.  Dissolve sugar using the plastic or wooden spoon or even better just swirl the jar gently until all the sugar dissolves.

2/  Add the kefir grains, dried figs or dried fruit of your choice and the lemon as is, do not sqeeze it yet.

3/  Cover the container with the cheesecloth or coffee filter and secure with an elastic.  (It should not be air tight.)

4/  Place away from sunlight and leave at room temperature of 18 C to 25 C.

(65F to 77F)

5/  Allow to ferment for 24, 48 or 72 hours.  For a stronger kefir, ferment the grains longer.

6/  Once the fermentation is completed to your satisfaction, squeeze the lemon.  (Use plastic tongs to get the lemon out of the water.  Do not put hands into the water.)

7/  Strain & separate the kefir grains separately from the fruit.  Store the kefir grains in a BHP free plastic container either in the fridge or the freezer.  When you want to make your next batch, just warm it up on the counter in your kitchen to room temperature…and start the whole process over again.

Benefits of Kefir are:

  1. Helps to restore normal flora inside your gut.
  2. Helps your probiotic to “implant” inside your gut.
  3. Crowds out unfriendly bacteria, yeast and parasites.
  4. Can get rid of “tummy aches” and pains in both adults and children.
  5. Good for breast feeding women to take in regularly to increase digestion & prevent colic in infants.
  6. Good for restoring normal flora after antibiotics especially when taken with a good Human Microflora strain of probiotic.
  7. Helps to manufacture certain Vitamins like some B vitamins, vitamin K, enzymes etc.
  8. Can help with hormone balance by crowding out the yeast.
  9. Can help get rid of food cravings due to low normal gut flora.

What you will need:


Colon Cleansing

3 12 2013
  1. Make sure that you take Magnesium citrate capsules or powder for at least one week before images-6you start the colonics.  Then make sure you continue to take them to keep your bowels regular and soft.  The dosage is: 4 capsules before bed and 2 in the morning.  It can be lowered if you get too loose or can be increased if you are not going at least 2 times per day.  With the powdered Magnesium, the best is to start with the highest dose suggested on the bottle then decrease it or increase it as you see necessary.
  2. Make sure to take the fiber drink that works for you.  Ground Chia seeds, Ground Flax seeds, Psyllium Combination Powder, and follow the directions on my website (At the bottom of the Book An Appointment page, look for “How to take a   Fiber Drink”.)
  3. Take your probiotic daily (HMF probiotic from Seroyal is the best as it stays in your body the longest.  Ask me about this if I haven’t told you already.) especially at the beginning of your suggested regime.  As you increase your fermented foods, you will need to take the probiotic less and less until you don’t need it anymore.  You can tell when you don’t need it anymore because you will not be bloated after you eat or later in the day any more.  (Provided you are eating the diet that is right for you.  Check my website: www.hiraihealth.com for recipes on fermented foods  under: healthinfo/articles&links.
  4.  Report any problems that you may have after the colonic like; a) feeling sleepy, b)increase in gas, c) right-sided lower abdominal/back pain d) not being able to have a bowel movement for more than a day after having a colonic. (Missing the day after having a colonic is normal.)  You need to call me when you have these symptoms.  Usually if you have any of these symptoms it means you have a dysbiosis, which is low good gut flora and increased yeast & parasites.  It can be easily solved by taking a parasite remedy or yeast remedy or a combination of the two.
  5. Remember it takes at least 3 colonic spaced out no more than 2 weeks apart, (1 week apart is recommended) to get decent results and most people need at least 6 colonics or more depending on the nature of your digestive issues.
  6. Once your colon is cleaned out you will need to have a “Maintenance Program” in place to help you maintain proper elimination & digestion.  This will vary from person to person and you will need a follow-up appointment after your series of colonics.  With this program you will be able to have colonics as a part of a cleansing program or before & after travel or as needed for general health maintenance.  Cleansing clinics around the world recommend a minimum of 3 colonics spring and fall for cleansing to help keep the body free of dis-ease.
  7. Eat fermented foods daily and especially on the days that you have colonics.  If you don’t know which fermented foods would be best for you, ask.  Fermented foods help the Probiotic Supplement stay in your system better.  The suggested minimum for fermented foods are 1/4 cup minimum for the kefir drinks and 1/8 to 1/4 cup fermented veges or yogurt. (This may vary from person to person and you may have to start at 1 tsp of kefir and work your way up to 1/4 cup.)
  8. Books on cleansing & colonics:  1) Tissue Cleansing Through Bowel Management by Dr. Bernard Jensen. 2) Colon Health by Norman Walker. 3)The Colon Health Handbook by Robert Gray.

If you have any questions or concerns or have any symptoms as listed under #4 of this list, please       email me or call me right away.

HAPPY CLEANSING!  🙂


Digestive Health

15 10 2013
  1. Why do people get bloated, gasey and constipated?imgres-5

The main causes are the heavy North American diet that most people devour.  What I mean by heavy foods is cooked grains & animal sourced foods like meat & dairy.  Some examples are; white bread, white pasta, white rice, hamburgers, steaks, pork, pizza, hotdogs, sausages etc.  Anything deep fried or full of sugar.

These foods are very heavy because they lack enzymes, vitamins & minerals used for digestion.   They are also hard to eliminate as well because they are low in fiber.  The stomach & liver become burdened with digesting this food and “food residue” is left in the intestines because it could not be burned “cleanly”.

Over the weeks & months this builds up in the intestines and impairs the digestion in the small & large intestines, because the food becomes rotten and turns into a “glue-like” substance-something like old gum on the sidewalk.  Hard to get off!  It clogs the delicate, finger-like projections in the small intestines and the body becomes auto-intoxicated because you will keep reabsorbing the toxins into your bloodstream causing the liver to constantly work cleaning the blood so you can stay alive without poisoning yourself.

Some of the symptoms of this malady are bloating, smelly gas, low energy after eating, dark circles under the eyes, bad breath, sensitive spots on the abdomen etc.

Some remedies for this problem are; a)  start eating “live” foods.  Foods like sprouts, raw veges, raw fruit, raw nuts and seeds.  b) do a cleanse which needs to include; fiber drinks with bentonite clay, herbs to help release the old “gum” on the intestinal walls, herbs for the liver & kidney and with the cleanse you must do juicing, skin brushing, colonics or at the very least enemas.  c)  do a daily fast once per week and to make it more effective do  skin brushing, but use a rebounder to really get the lymphatic system moving and drink tons of water with fresh lemon & cayenne pepper.  (You can do this longer if you like) d) Take enzymes with the heavy protein meals even with the vegetarian meals on a daily basis.

The main idea is to eat so you can digest properly by incorporating foods easy to digest while also clearing the intestines of the “goop” so you can also absorb what you digest.  Happy assimilation!


How to Make a Garlic Suppository for Vaginitis

26 07 2013

INGREDIENTS:                                                                                                            imgres-1


  1. One garlic clove, medium sized. (Or use 2 small cloves.)
  2. Small strip of cheese cloth cut to the width( 2.5 cm wide) of the garlic clove and about 15 cm long.
  3. Olive Oil.
  4. Clean stainless steel bowl that has been recently run through the dish washer.
  5. Ziploc baggie.

6. Light panty liner.


PROCEDURE:


  1. Peel garlic clove.
  2. Hit the peeled garlic clove once with the side of a chopping knife to make the garlic clove split open but not fall apart.  (This is to help the garlic oil get out of the clove and go through the cheesecloth and olive oil…it will make sense once you follow all the steps.)
  3. Wrap the strip of cheesecloth around the clove of garlic that should now have a split in it.
  4. Pour the olive oil, about 1 tbsp into the bowl.
  5. Dip the cheesecloth wrapped garlic clove into the oil and really soak the cheesecloth.
  6. Store in the ziploc baggie until the evening.


INSERTING & REMOVING THE GARLIC SUPPOSITORY:


  1. Right before bed, remove the prepared garlic clove from the ziploc baggie.
  2. Place the clove just inside your vagina.  Make sure that it is fully inserted, but near the opening to make it easier to remove in the morning.
  3. Go to bed with the clove inserted for the whole night.
  4. When you wake up in the morning, remove the garlic clove and put a panty liner inside your underwear to absorb any mucus or liquid that will come out of your vagina through out the day.
  5. Save the clove for one more application, then throw it out.  Place it in the ziploc bag in a cool location.
  6. You can do this several days in a row or alternate it with acidophilus inserted in your vagina.
  7. Do it as often as you wish until you do not have any itching or vaginal discharge.  (Contrary to popular belief, the only time you should have vaginal discharge is when you ovulate or before coitus.)

Please note:  This is not deemed to be medical advice. Whoever decides to utilize this information will be taking full responsibility for the outcome.  This does not take the place of regular medical attention or visits to your doctor.


How to Make Coconut Water Kefir Correctly.

25 07 2013

How to Make Coconut Water Kefir Correctly..


How to Make Coconut Water Kefir Correctly.

25 07 2013

STEP 1:  Rehydrating the Heirloom Culture.                                                                          imgres

  1. Dissolve 4 to 6 tablespoons of whole cane sugar in 4 cups of water.  (Slightly heat the water to dissolve all the sugar.  The water will be slightly brown from using the whole cane sugar.)  Be sure to all the water to COOL TO ROOM TEMPERATURE before proceeding to the next step.
  2. Place the dehydrated kefir grains in the water and cover with a towel or coffee filter secured with a rubber band.  Allow the mixture to sit for 3 to 4 days until the grains are plump.  Do not allow the mixture to sit for longer than 5 days.
  3. Once the grains are rehydrated, follow the instructions below for making Coconut water kefir.

STEP 2.:  Making the Coconut Water Kefir.

  1. Purchase the Organic Young Thai Coconut Water from your local health food store.  In Calgary, Community Health Food Store carries this in their FREEZER.  This Coconut Water seems to be the best.  The cheaper brands make a poorer quality kefir and I don’t recommend it.
  2. Culture only 1/2 the bottle or 1/3 to start with to make sure it cultures correctly.
  3. Take a 1/2 litre sealer jar and run it through the dishwasher to sterilize it.
  4. Make sure the jar is cooled to room temperature before putting the culture in it.
  5. Use only glass jars and wooden utensils.  Do not put other fermented food near this jar to prevent cross contamination.
  6. Now place 1/3 of the Coconut Water or 1/2 the Coconut Water in the sterilzed jar with the rehydrating kefir grains.
  7. Allow the mixture to culture for 24 to 48 hours before removing the kefir grains.
  8. Please note: Sometimes the grains turn to a powder, do not rinse this…it will disappear down the drain.  Just use it anyway by draining off as much of the Coconut Water Kefir as possible and just reinoculate another fresh batch of Coconut Water by pouring some directly in the same jar as the culture.
  9. For extensive troubleshooting information please visit:  www.culturesforhealth.com/troubleshooting
  10. PLEASE MAKE SURE TO REFRIGERATE YOUR CULTURE ONCE IT IS FERMENTED.  THIS WILL MAKE THE CULTURE DORMANT.
  11. IF IT HAS TURNED INTO A POWDER, THEN THIS CAN BE POURED INTO ANOTHER STERILIZED JAR AND KEPT IN THE FRIDGE UNTIL YOU ARE READY TO USE IT AGAIN OR JUST LEAVE IT IN A BIT OF THE CULTURE IN THE FRIDGE UNTIL YOU ARE READY TO USE IT AGAIN.
  12. OR IF IT IS STILL GRAINS, THEN YOU CAN STRAIN THEM OUT, RINSE THEM AND PUT IN THE FREEZER UNTIL YOU NEED THEM AGAIN.
  13. OR YOU CAN JUST LEAVE THE GRAINS IN A BIT OF THE CULTURE AND KEEP IT IN THE FRIDGE.